
Convert JPG Images To WebP Using Python
WebP is a method of image compression used on many images found on the modern internet. The degree of reduction (compression) is adjustable so that a user can choose the trade-off between file size and image quality. On average, WebP achieves 30% more compression than JPEG and JPEG 2000 without losing image quality (see Comparative Study). The WebP format essentially aims at creating smaller, better-looking images that can help make web pages load faster.
What is WebP And Why Should I Use It?
Google developed WebP in 2010. However, it didn’t gain widespread usage until 2020, when Apple added support for WebP on the Desktop and Mobile versions of Safari. At this time, 93.3% of browsers support WebP by default.
If you are not using WebP for your images, you absolutely should. Image sizes will be smaller than their original file size, which means faster page loads. In addition, WebP is considered a next-generation image format, so using WebP will also positively impact your PageSpeed score. Depending on how image heavy your website is, this will also have an impact on your PageRank.
Put succinctly, there is no excuse not to use WebP images across your site or eCommerce store.
Code Example: Convert Folder Of JPG/JPEG, TIFF And GIF to WebP
You can adjust this example to fit your use case because many content management systems store media and image assets differently.
In this example, we will use a single directory on a computer or server to do the conversion as a large batch.
Before we cut and paste like we’re on Stack Overflow - we first need to grab Pillow, because that is what is actually doing the conversion:
$ pip install pillow
$ pip install pillowStep 1: Cut and Paste JPG, PNG, GIF to WebP Script From Example Below:
 1
 2
 3
 4
 5
 6
 7
 8
 9
10
11
12
13
14
15
16
17
18
19
20
21
22
23
24
25
26
27
28
29
30
31
32
33
34
35
36
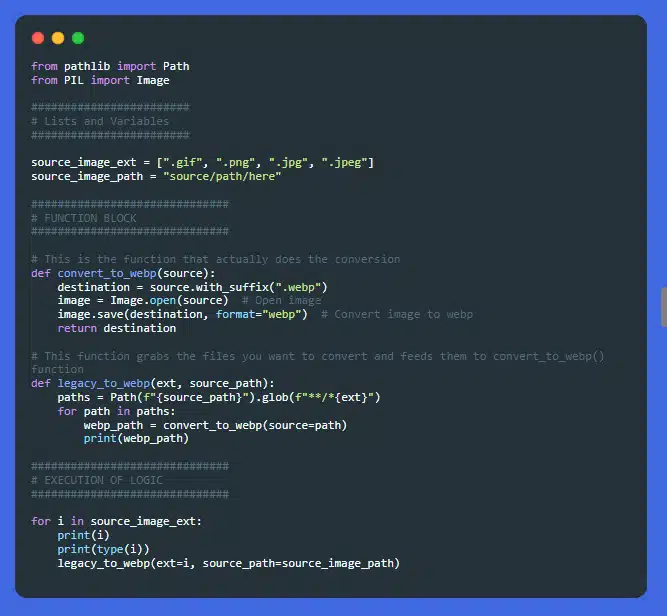
from pathlib import Path
from PIL import Image

########################
# Lists and Variables
########################

source_image_ext = [".gif", ".png", ".jpg", ".jpeg"]
source_image_path = "source/path/here"

##############################
# FUNCTION BLOCK
##############################

# This is the function that actually does the conversion
def convert_to_webp(source):
    destination = source.with_suffix(".webp")
    image = Image.open(source)  # Open image
    image.save(destination, format="webp")  # Convert image to webp
    return destination

# This function grabs the files you want to convert and feeds them to convert_to_webp() function
def legacy_to_webp(ext, source_path):
    paths = Path(f"{source_path}").glob(f"**/*{ext}")
    for path in paths:
        webp_path = convert_to_webp(source=path)
        print(webp_path)

##############################
# EXECUTION OF LOGIC
##############################

for i in source_image_ext:
    print(i)
    print(type(i))
    legacy_to_webp(ext=i, source_path=source_image_path)
|
|
Step 2: Change Path, Save The Script
Name the file imageconvert.py (or whatever you see fit to call it) somewhere in your workspace and change line 8 “source/path/here” to the path on your filesystem that contains the images you want to convert.
Step 3: Execute the imageconvert.py
Run the following command from your terminal:
$ python imageconvert.py
$ python imageconvert.pyIn the directory that you specified for conversion, you will see a bunch of new .webp files. Congratulations! You just converted all your images to a nextgen image format. Now, depending on your workflow, you can uploiad these files to your CMS, and drop them into your articles or product pages. If you are converting existing images, you will nneed to go through your code or database and rename all the images that are presently linked in your posts/pages/products from .jpg (or whatever they are) to .webp and test.
Optional: Tweaks
There are a variety of things that you can tweak in this code. If your WebP images are still coming out 1mb or more, you can change line 19 to look like the following:
19
image.save(destination, format="webp", optimize=True, quality=10)
|
|
Quality goes from 1 (worst quality possible) to 100 (best quality possible). The lower the number, the smaller the output size will be. You might notice some image degredation depending on what the nature of the source image was, so you will need to tweak this according to your quality preferences.
Closing Thoughts
It’s worth noting that when you run this script, it leaves the source images untouched. You can modify this script to get rid of the source images, if you so choose. Depending on the CMS or shopping cart that you are running, you can configure it to use a fallback image if the you have users running older browsers.